ISSN 0253-2778

CN 34-1054/N

Open AccessOpen Access JUSTC Engineering&Materials 10 June 2022

Effect of speckle size on surface crack detection via digital image correlation

Cite this:
https://doi.org/10.52396/JUSTC-2021-0160
More Information
  • Author Bio:

    Milad Z. Aghdam received his Bachelor’s degree from the Iran University of Science and Technology and his Master’s degree from the University of Tehran. His research interests include experimental stress analysis methods and NDT, both associated with fracture mechanics and life assessments

    Nasser Soltani pursued his Bachelor’s and Master’s degrees from the University of Oklahoma from 1981 to 1985. He received his Ph.D. degree in 1989 from Iowa State University. After that, he started his professional work at the University of Tehran until now. His research mainly focuses on experimental stress analysis methods and fracture mechanics

  • Corresponding author: E-mail: zolfipoor81@gmail.com
  • Received Date: 14 July 2021
  • Accepted Date: 23 October 2021
  • Available Online: 10 June 2022
  • Digital image correlation (DIC) is an experimental stress analysis technique used in nondestructive tests. The accuracy of DIC in crack detection depends on various factors such as the sizes of speckles and pixels. In the current study, a speckle pattern based on the spreading of nanoparticles with small speckles is compared with a conventional sprayed pattern to understand whether crack detection via DIC is improved by reducing the sizes of speckles and pixels. Owing to the small size of nanoparticles, an optical microscope is used for magnification. The spreading method for crack detection is first investigated experimentally. Results show that cracks can be detected easily when a 250 nm opening appears in the crack edges. Subsequently, the spreading method is compared with the conventional DIC, in which the spraying method is used for patterning, in terms of crack detection. Results show that by reducing the speckle size and closely analyzing the speckle pattern, the DIC technique is considerably better than the conventional technique in detecting small cracks. Moreover, the conventional method is more suitable for detecting large cracks.
    Comparison between two speckle patterns containing conventional spraying method and nanoparticle spreading in surface crack detection by DIC technique.
    Digital image correlation (DIC) is an experimental stress analysis technique used in nondestructive tests. The accuracy of DIC in crack detection depends on various factors such as the sizes of speckles and pixels. In the current study, a speckle pattern based on the spreading of nanoparticles with small speckles is compared with a conventional sprayed pattern to understand whether crack detection via DIC is improved by reducing the sizes of speckles and pixels. Owing to the small size of nanoparticles, an optical microscope is used for magnification. The spreading method for crack detection is first investigated experimentally. Results show that cracks can be detected easily when a 250 nm opening appears in the crack edges. Subsequently, the spreading method is compared with the conventional DIC, in which the spraying method is used for patterning, in terms of crack detection. Results show that by reducing the speckle size and closely analyzing the speckle pattern, the DIC technique is considerably better than the conventional technique in detecting small cracks. Moreover, the conventional method is more suitable for detecting large cracks.
    • A novel simple method is introduced for speckle pattern creation in digital image correlation technique based on nanoparticle coating.
    • The new method is validated for real crack detection using an optical microscope.
    • A real crack is successfully detected by the method.
    • The conventional DIC technique using the spraying method for pattern creation is compared with the new method.
    • The advantage of the new method is verified.

  • loading
  • [1]
    Akbari D, Soltani N. Investigation of loading parameters in detection of internal cracks of composite material with digital shearography. World Applied Sciences Journal, 2013, 21 (4): 526–535.
    [2]
    Asemani H, Jinwoo Park J, Lee J R, et al. Development of PZT-excited stroboscopic shearography for full-field nondestructive evaluation. Review of Scientific Instruments, 2017, 88 (5): 053301. doi: https://doi.org/10.1063/1.4981938
    [3]
    Eshraghi I, Dehnavi M Y, Soltani N. Effect of subset parameters selection on the estimation of mode-I stress intensity factor in a cracked PMMA specimen using digital image correlation. Polymer Testing, 2014, 37: 193–200. doi: https://doi.org/10.1016/j.polymertesting.2014.05.017
    [4]
    Abshirini M, Soltani N, Marashizadeh P. On the mode I fracture analysis of cracked Brazilian disc using a digital image correlation method. Optics and Lasers in Engineering, 2016, 78: 99–105. doi: https://doi.org/10.1016/j.optlaseng.2015.10.006
    [5]
    Sahlabadi M, Soltani N. Experimental and numerical investigations of mixed-mode ductile fracture in high-density polyethylene. Archive of Applied Mechanics, 2018, 88 (6): 933–942. doi: https://doi.org/10.1007/s00419-018-1350-5
    [6]
    Dehnavi M Y, Eshraghi I, Soltani N. Investigation of fracture parameters of edge V-notches in a polymer material using digital image correlation. Polymer Testing, 2013, 32 (4): 778–784. doi: https://doi.org/10.1016/j.polymertesting.2013.03.012
    [7]
    Abshirini M, Dehnavi M Y, Beni M A, et al. Interaction of two parallel U-notches with tip cracks in PMMA plates under tension using digital image correlation. Theoretical and Applied Fracture Mechanics, 2014, 70: 75–82. doi: https://doi.org/10.1016/j.tafmec.2014.02.001
    [8]
    McCormick N J, Lord J D. Practical in-situ applications of DIC for large structures. Applied Mechanics and Materials, 2010, 24: 161–166. doi: https://doi.org/10.4028/www.scientific.net/AMM.24-25.161
    [9]
    Rajaram S, Vanniamparambil P A, Khan F, et al. Full-field deformation measurements during seismic loading of masonry buildings. Structural Control Health Monitoring, 2017, 24 (4): 1903. doi: https://doi.org/10.1002/stc.1903
    [10]
    Iliopoulos S, Aggelis D G, Pyl L, et al. Detection and evaluation of cracks in the concrete buffer of the Belgian Nuclear Waste container using combined NDT techniques. Construction and Building Materials, 2015, 78: 369–378. doi: https://doi.org/10.1016/j.conbuildmat.2014.12.036
    [11]
    Bertelsen I M G, Kragha C, Cardinaud G, et al. Quantification of plastic shrinkage cracking in mortars using digital image correlation. Cement and Concrete Research, 2019, 123: 105761. doi: https://doi.org/10.1016/j.cemconres.2019.05.006
    [12]
    Zhao B, Lei D, Fu J, et al. Experimental study on micro-damage identification in reinforced concrete beam with wavelet packet and DIC method. Construction and Building Materials, 2019, 210: 338–346. doi: https://doi.org/10.1016/j.conbuildmat.2019.03.175
    [13]
    Dong Y L, Pan B. A review of speckle pattern fabrication and assessment for digital image correlation. Experimental Mechanics, 2017, 57 (8): 1161–1181. doi: https://doi.org/10.1007/s11340-017-0283-1
    [14]
    Mehdikhani M, Steensels E, Standaert A, et al. Multi-scale digital image correlation for detection and quantification of matrix cracks in carbon fiber composite laminates in the absence and presence of voids controlled by the cure cycl. Composites Part B: Engineering, 2018, 154: 138–147. doi: https://doi.org/10.1016/j.compositesb.2018.07.006
    [15]
    Kammers A D, Daly S. Self-assembled nanoparticle surface patterning for improved digital image correlation in a scanning electron microscope. Experimental Mechanics, 2013, 53 (8): 1333–1341. doi: https://doi.org/10.1007/s11340-013-9734-5
    [16]
    Berfield T A, Patel J K, Shimmin R G, et al. Micro-and nanoscale deformation measurement of surface and internal planes via digital image correlation. Experimental Mechanics, 2007, 47 (1): 51–62. doi: https://doi.org/10.1007/s11340-006-0531-2
    [17]
    Reu P. All about speckles: speckle density. Experimental Techniques, 2015, 39 (3): 1–2. doi: https://doi.org/10.1111/ext.12161
    [18]
    Reu P. All about speckles: speckle size measurement. Experimental Techniques, 2014, 38 (6): 1–2. doi: https://doi.org/10.1111/ext.12110
    [19]
    Reu P. All about speckles: contrast. Experimental Techniques, 2015, 39 (1): 1–2. doi: https://doi.org/10.1111/ext.12126
    [20]
    Reu P. All about speckles: edge sharpness. Experimental Techniques, 2015, 39 (2): 1–2. doi: https://doi.org/10.1111/ext.12139
    [21]
    Reu P. All about speckles: aliasing. Experimental Techniques, 2014, 38 (5): 1–3. doi: https://doi.org/10.1111/ext.12111
  • 加载中

Catalog

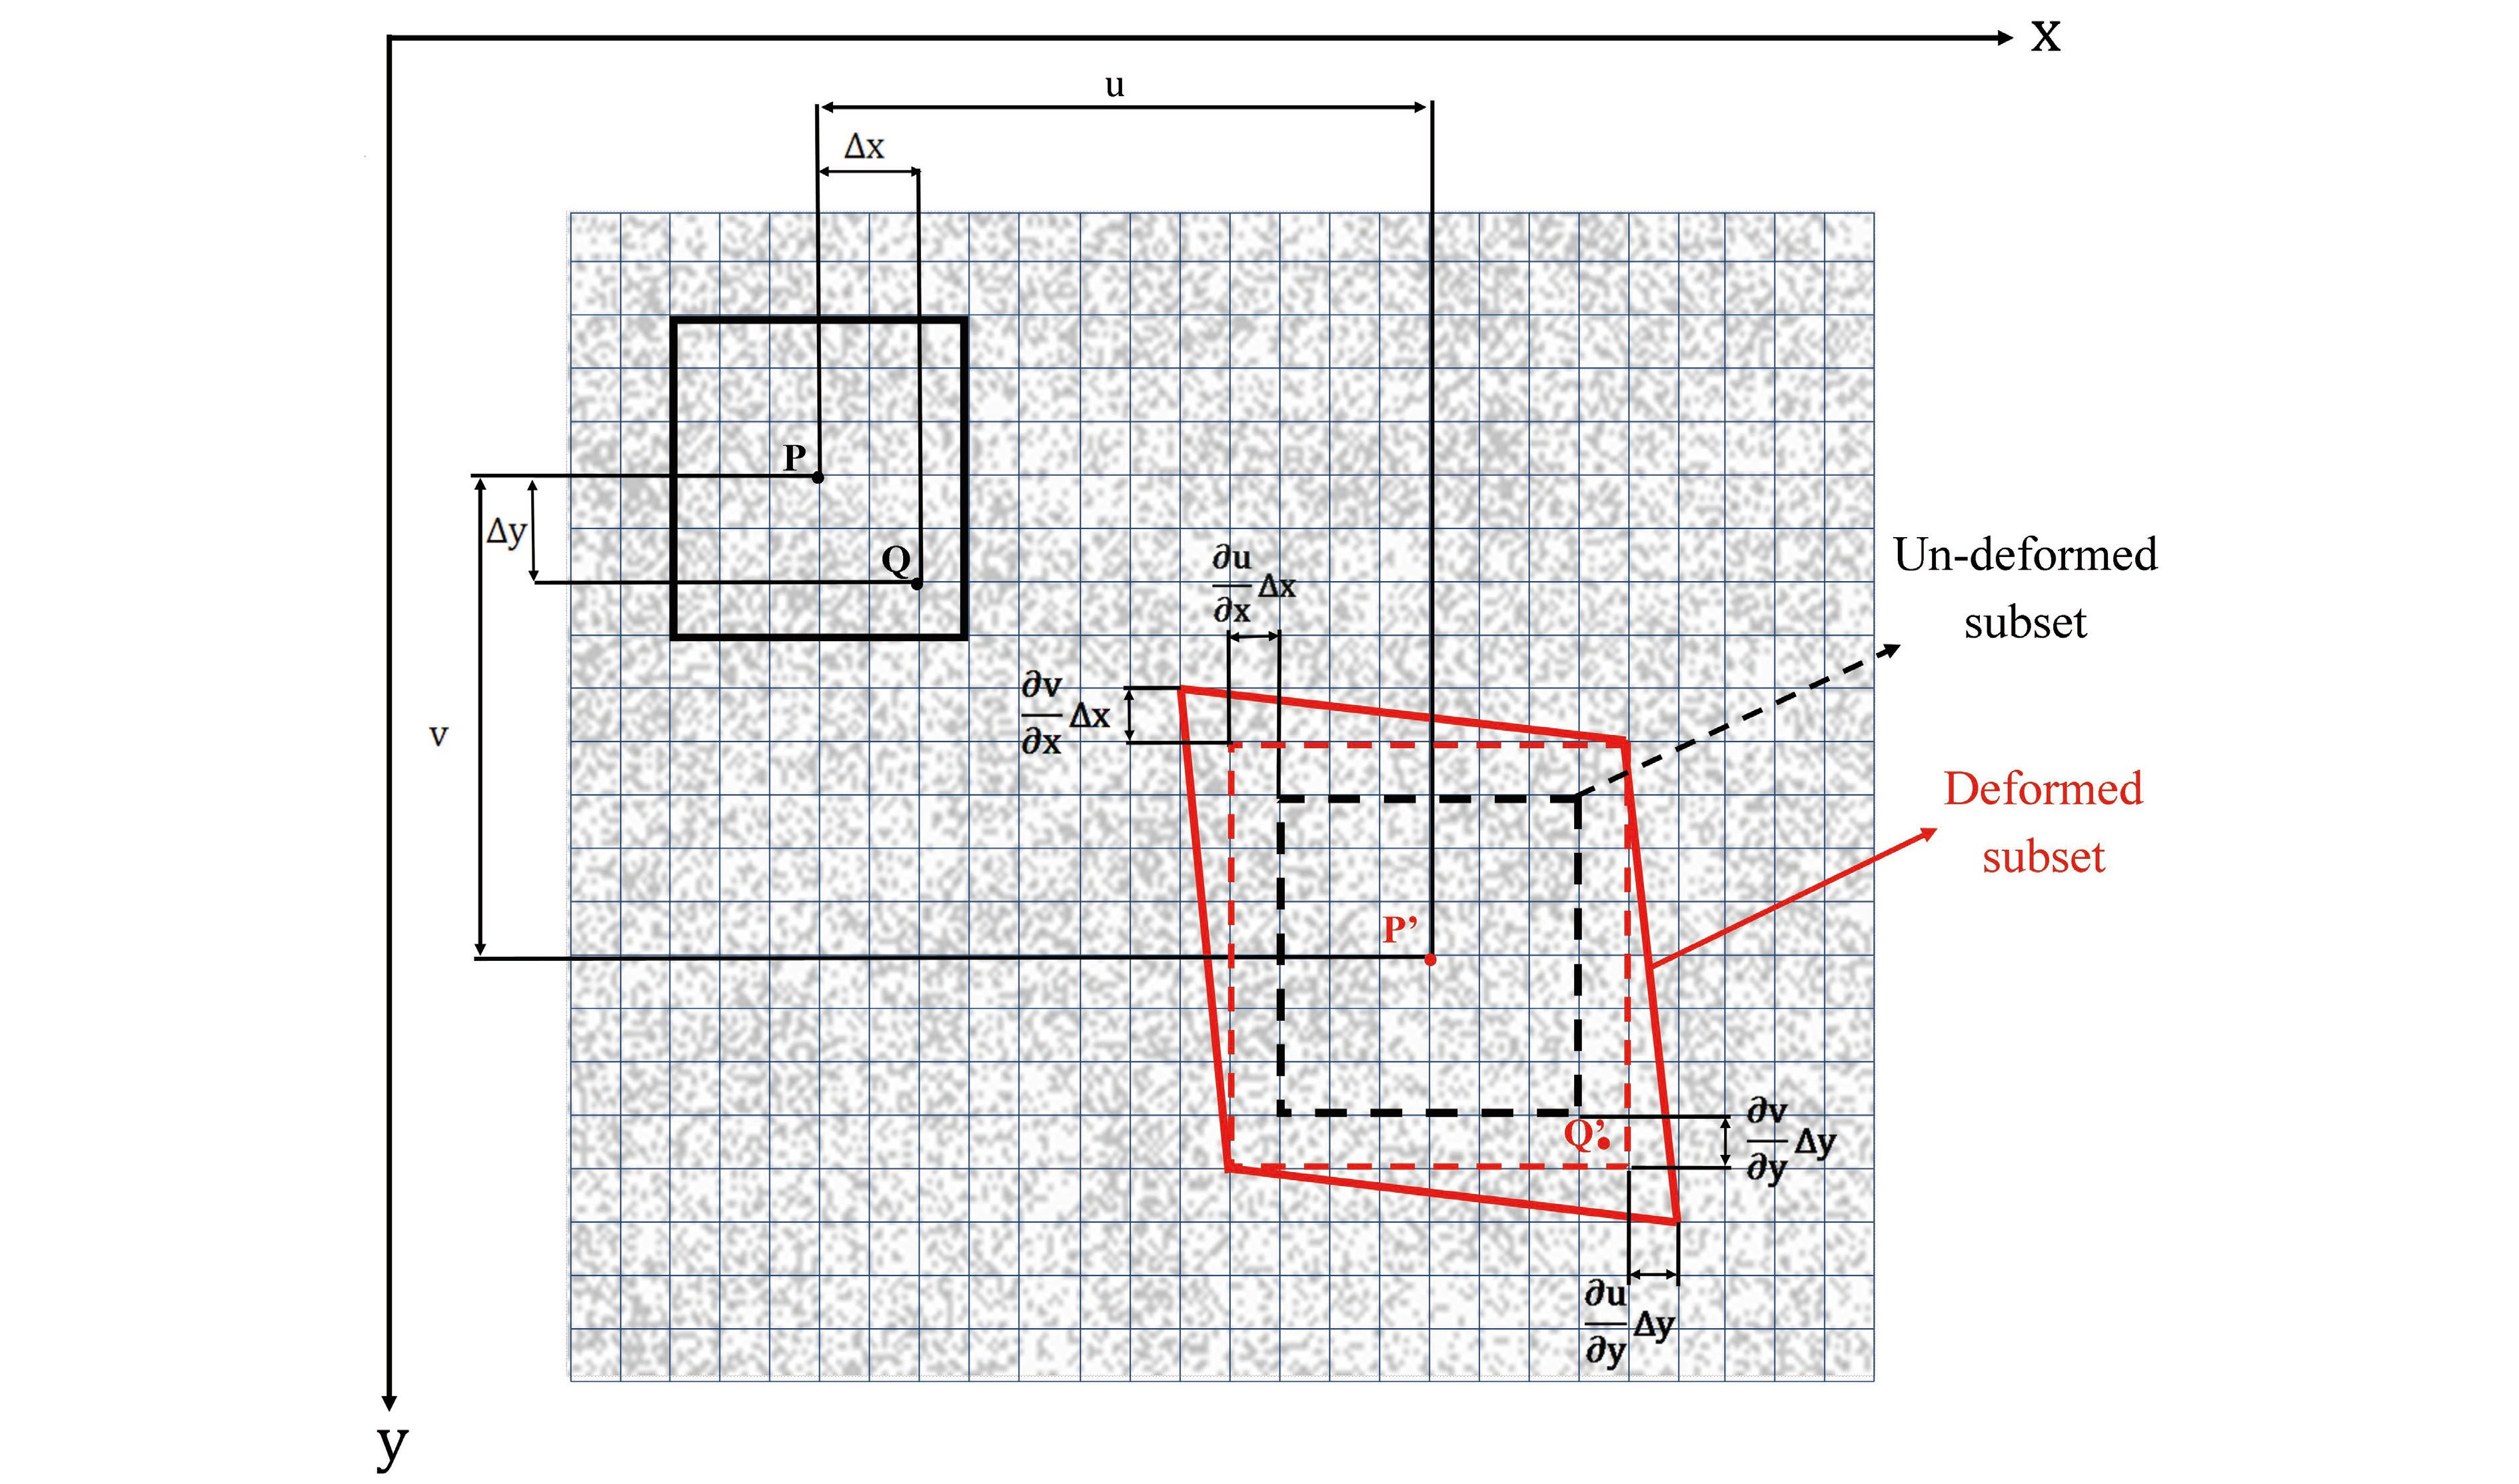
    Figure  1.  Correlation process of algorithm.

    Figure  2.  Sample of pattern created by spreading nanoparticle viewed under digital microscope.

    Figure  3.  Illustration showing preparation of surface-cracked specimens for first part of study.

    Figure  4.  Dimensions of specimen used in first part of study.

    Figure  5.  Specimen for test: (a) Before loading process (with a notch on specimen); (b) final specimen with invisible crack.

    Figure  6.  First specimen with pattern.

    Figure  7.  Setup used for test in first part of study.

    Figure  8.  Dimensions of specimen used for second part. of study.

    Figure  9.  Notch created on one side of second. specimen.

    Figure  10.  Process of creating of a fatigue crack on the surface of the second specimen.

    Figure  11.  Speckle pattern created on second specimen via (a) spraying and (b) nanoparticle coating.

    Figure  12.  Speckle pattern created on second specimen (with ROI shown) via (a) spraying and (b) nanoparticle coating.

    Figure  13.  Setup for conventional method used in second part of study.

    Figure  14.  Crack detected on metallic specimen when using proposed method to create speckle pattern.

    Figure  15.  Result of proposed method for crack detection at various strain levels.

    Figure  16.  Result of small crack detection by conventional method at various strain levels.

    Figure  17.  Result of large crack detection by conventional method at various strain levels.

    [1]
    Akbari D, Soltani N. Investigation of loading parameters in detection of internal cracks of composite material with digital shearography. World Applied Sciences Journal, 2013, 21 (4): 526–535.
    [2]
    Asemani H, Jinwoo Park J, Lee J R, et al. Development of PZT-excited stroboscopic shearography for full-field nondestructive evaluation. Review of Scientific Instruments, 2017, 88 (5): 053301. doi: https://doi.org/10.1063/1.4981938
    [3]
    Eshraghi I, Dehnavi M Y, Soltani N. Effect of subset parameters selection on the estimation of mode-I stress intensity factor in a cracked PMMA specimen using digital image correlation. Polymer Testing, 2014, 37: 193–200. doi: https://doi.org/10.1016/j.polymertesting.2014.05.017
    [4]
    Abshirini M, Soltani N, Marashizadeh P. On the mode I fracture analysis of cracked Brazilian disc using a digital image correlation method. Optics and Lasers in Engineering, 2016, 78: 99–105. doi: https://doi.org/10.1016/j.optlaseng.2015.10.006
    [5]
    Sahlabadi M, Soltani N. Experimental and numerical investigations of mixed-mode ductile fracture in high-density polyethylene. Archive of Applied Mechanics, 2018, 88 (6): 933–942. doi: https://doi.org/10.1007/s00419-018-1350-5
    [6]
    Dehnavi M Y, Eshraghi I, Soltani N. Investigation of fracture parameters of edge V-notches in a polymer material using digital image correlation. Polymer Testing, 2013, 32 (4): 778–784. doi: https://doi.org/10.1016/j.polymertesting.2013.03.012
    [7]
    Abshirini M, Dehnavi M Y, Beni M A, et al. Interaction of two parallel U-notches with tip cracks in PMMA plates under tension using digital image correlation. Theoretical and Applied Fracture Mechanics, 2014, 70: 75–82. doi: https://doi.org/10.1016/j.tafmec.2014.02.001
    [8]
    McCormick N J, Lord J D. Practical in-situ applications of DIC for large structures. Applied Mechanics and Materials, 2010, 24: 161–166. doi: https://doi.org/10.4028/www.scientific.net/AMM.24-25.161
    [9]
    Rajaram S, Vanniamparambil P A, Khan F, et al. Full-field deformation measurements during seismic loading of masonry buildings. Structural Control Health Monitoring, 2017, 24 (4): 1903. doi: https://doi.org/10.1002/stc.1903
    [10]
    Iliopoulos S, Aggelis D G, Pyl L, et al. Detection and evaluation of cracks in the concrete buffer of the Belgian Nuclear Waste container using combined NDT techniques. Construction and Building Materials, 2015, 78: 369–378. doi: https://doi.org/10.1016/j.conbuildmat.2014.12.036
    [11]
    Bertelsen I M G, Kragha C, Cardinaud G, et al. Quantification of plastic shrinkage cracking in mortars using digital image correlation. Cement and Concrete Research, 2019, 123: 105761. doi: https://doi.org/10.1016/j.cemconres.2019.05.006
    [12]
    Zhao B, Lei D, Fu J, et al. Experimental study on micro-damage identification in reinforced concrete beam with wavelet packet and DIC method. Construction and Building Materials, 2019, 210: 338–346. doi: https://doi.org/10.1016/j.conbuildmat.2019.03.175
    [13]
    Dong Y L, Pan B. A review of speckle pattern fabrication and assessment for digital image correlation. Experimental Mechanics, 2017, 57 (8): 1161–1181. doi: https://doi.org/10.1007/s11340-017-0283-1
    [14]
    Mehdikhani M, Steensels E, Standaert A, et al. Multi-scale digital image correlation for detection and quantification of matrix cracks in carbon fiber composite laminates in the absence and presence of voids controlled by the cure cycl. Composites Part B: Engineering, 2018, 154: 138–147. doi: https://doi.org/10.1016/j.compositesb.2018.07.006
    [15]
    Kammers A D, Daly S. Self-assembled nanoparticle surface patterning for improved digital image correlation in a scanning electron microscope. Experimental Mechanics, 2013, 53 (8): 1333–1341. doi: https://doi.org/10.1007/s11340-013-9734-5
    [16]
    Berfield T A, Patel J K, Shimmin R G, et al. Micro-and nanoscale deformation measurement of surface and internal planes via digital image correlation. Experimental Mechanics, 2007, 47 (1): 51–62. doi: https://doi.org/10.1007/s11340-006-0531-2
    [17]
    Reu P. All about speckles: speckle density. Experimental Techniques, 2015, 39 (3): 1–2. doi: https://doi.org/10.1111/ext.12161
    [18]
    Reu P. All about speckles: speckle size measurement. Experimental Techniques, 2014, 38 (6): 1–2. doi: https://doi.org/10.1111/ext.12110
    [19]
    Reu P. All about speckles: contrast. Experimental Techniques, 2015, 39 (1): 1–2. doi: https://doi.org/10.1111/ext.12126
    [20]
    Reu P. All about speckles: edge sharpness. Experimental Techniques, 2015, 39 (2): 1–2. doi: https://doi.org/10.1111/ext.12139
    [21]
    Reu P. All about speckles: aliasing. Experimental Techniques, 2014, 38 (5): 1–3. doi: https://doi.org/10.1111/ext.12111

    Article Metrics

    Article views (779) PDF downloads(906)
    Proportional views

    /

    DownLoad:  Full-Size Img  PowerPoint
    Return
    Return